
The little herb that could…
Discover Skyline Farms’ Dad’s Garden Pesto — a vegan basil pesto recipe that’s nutty, bright, and the perfect match for summer. Try it in cucumber salad, summer pasta, or zucchini Caprese stacks with pesto.
The Story Behind Dad’s Garden Pesto + 3 Summer Recipes:
When we started Skyline Farms, we didn’t really have any expectations. We simply wanted to let the garden — and whatever bloomed — speak to us.
This year, it spoke loud and clear through basil.
Matthew has been trying to grow basil for twelve years, and for the first time ever, he had wild success. Out of that abundance came his signature recipe: Dad’s Garden Pesto. It’s bright, vegan, nutty (without pine nuts), and the perfect complement to just about anything — pasta, veggies, sandwiches, or honestly, straight from the spoon (don’t ask me how I know 😉).
It’s quickly become our farm’s signature item. In fact, it’s the only green thing I can get Emmet to eat! We can’t keep it on the shelf, and we’re already planning to grow beds and beds of basil next season to keep the pesto flowing.
For me, this pesto feels like the divine masculine in action — something steady, simple, and supportive that makes life easier. And since Skyline Farms is all about the pleasure of being a woman, it feels like the perfect companion: one less thing to figure out at dinnertime, while still bringing beauty and nourishment to the table.
Come taste the pesto, stock up for the week or a family gathering, sip iced tea, eat zucchini cake, wander the blooms, and enjoy these waning moments of summer.
🥒 Recipe 1: Cucumber Pesto Salad
Serves 4
Ingredients:
2 large cucumbers, sliced into thin half-moons
1 pint cherry tomatoes, halved
½ red onion, thinly sliced
½ cup Dad’s Garden Pesto
Juice of ½ lemon
Salt & pepper to taste
Optional: crumbled feta or toasted pine nuts
Instructions:
Toss cucumbers, tomatoes, and onion in a large bowl.
Stir in pesto and lemon juice until evenly coated.
Season with salt and pepper. Garnish with feta or pine nuts if desired.
🍝 Recipe 2: Summer Pasta with Pesto
Serves 6
Ingredients:
1 lb short pasta (penne, fusilli, or farfalle)
1 cup Dad’s Garden Pesto
1 cup cherry tomatoes, halved
1 ear corn, kernels removed (or 1 cup frozen corn)
1 medium zucchini, diced and lightly sautéed
½ cup grated Parmesan
Instructions:
Cook pasta until al dente. Reserve ½ cup cooking water, then drain.
Toss hot pasta with pesto, adding splashes of pasta water for creaminess.
Fold in tomatoes, corn, and zucchini.
Finish with Parmesan. Serve warm or chilled.
🍅 Recipe 3: Zucchini Caprese Stacks with Pesto
Serves 4–6
Ingredients:
2 large zucchinis, cut into ½-inch thick rounds
Olive oil, for brushing
Salt & pepper
2 ripe tomatoes, sliced
8 oz fresh mozzarella, sliced
½ cup Dad’s Garden Pesto
Optional: fresh basil leaves + balsamic glaze
Instructions:
Brush zucchini with olive oil; season with salt and pepper.
Grill (or roast at 425°F) until tender and lightly golden, 3–4 minutes per side.
On a platter, layer zucchini + mozzarella + tomato. Repeat for stacks.
Spoon pesto over the top. Garnish with basil and drizzle with balsamic if desired.
Save Money & Reduce Waste: Turn Leftover Fruit into Homemade Fruit Leather
Save Money & Reduce Waste: Turn Leftover Fruit into Homemade Fruit Leather
We’ve all been there—a bunch of bananas ripening too fast, a bag of frozen berries pushed to the back of the freezer, or a can of peaches that’s been sitting in the pantry a little too long. Instead of tossing them, why not turn them into something delicious, healthy, and budget-friendly?
Homemade fruit leather is an easy way to reduce waste, save money, and keep the kids entertained with a fun kitchen project. Store-bought fruit snacks can be loaded with artificial ingredients and added sugars, but making your own lets you control exactly what goes into them. Plus, it's a great way to make use of fruit that’s past its prime without it going to waste.
Whether you’re packing school lunches, looking for an easy grab-and-go snack, or just want to get creative in the kitchen with the kids, this simple recipe is a win for your wallet, your home, and the planet.
Why You’ll Love Homemade Fruit Leather
💰 Saves Money – No need to buy expensive snacks when you can make your own for pennies.
🌱 Reduces Food Waste – Use up fruit before it spoils, cutting down on unnecessary waste.
👩🍳 Fun for Kids – A great hands-on activity to get little ones involved in the kitchen.
🥭 Healthy & Delicious – No refined sugars, preservatives, or artificial flavors—just pure fruit goodness.
🎒 Perfect for On-the-Go – A mess-free snack for lunchboxes, hikes, and road trips.
What You’ll Need
2-4 cups of fruit (frozen, canned in juice, or overripe fresh fruit)
1-2 tbsp of honey or maple syrup (optional, for added sweetness)
1 tbsp of lemon juice (helps preserve color and adds brightness)
Optional add-ins: cinnamon, yoghurt, vanilla, ginger, fresh herbs, like basil or mint
How to Make It
Step 1: Prep Your Fruit
Frozen fruit? Let it thaw and drain excess liquid.
Canned fruit? Drain and rinse to remove extra syrup.
Overripe fresh fruit? Remove any bruised spots, but keep the sweet, soft goodness.
Step 2: Blend Until Smooth
Toss your fruit into a blender or food processor with lemon juice and any optional sweeteners or spices. Blend until completely smooth. If the mixture is too thick, add a splash of water or juice to thin it out.
Step 3: Cook the Puree (Optional but Recommended)
For a thicker consistency (which helps the leather dry more evenly), pour the fruit mixture into a saucepan and simmer on low heat for 10-15 minutes. Stir occasionally.
Step 4: Spread & Dry
Oven Method: Preheat oven to 150-170°F (or the lowest setting). Line a baking sheet with parchment paper or a silicone mat. Spread the puree evenly, about 1/8 inch thick. Bake for 4-6 hours, checking occasionally. It’s ready when it’s dry to the touch but still pliable.
Dehydrator Method: Spread the puree onto dehydrator trays lined with parchment or nonstick sheets. Set to 135°F and dry for 6-8 hours, or until firm but flexible.
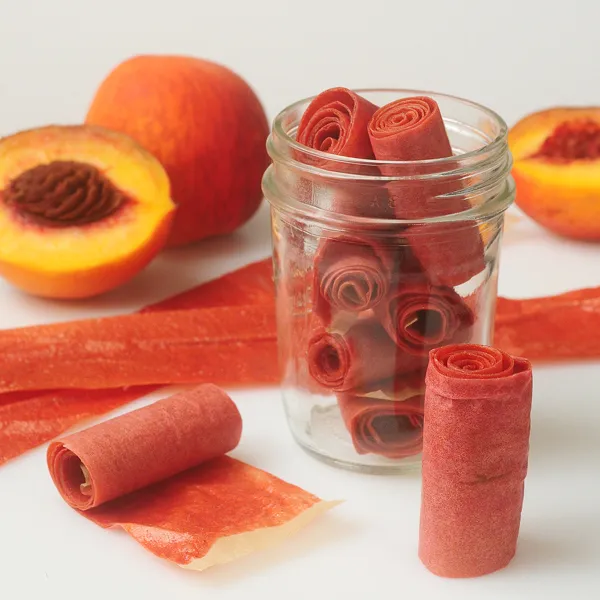
Step 5: Cut & Store
Once completely cool, peel off the parchment or mat and cut the leather into strips. Roll them up with parchment paper to prevent sticking. Store in an airtight container for up to a month, or freeze for longer storage.
Flavor Combinations to Try
🍓 Berry Blend – Strawberries + blueberries + a touch of honey
🍏 Apple Cinnamon – Apples + cinnamon + a pinch of nutmeg
🥭 Tropical Twist – Mango + banana + coconut flakes
🍑 Peach Vanilla – Peaches + a splash of vanilla extract
A Smart & Sustainable Snack for the Whole Family
By turning forgotten fruit into homemade fruit leather, you’re making a smart choice—one that saves money, reduces waste, and provides a healthy snack everyone can enjoy. And if you have kids, let them help! They’ll love watching the fruit transform into chewy, naturally sweet treats they can roll up and snack on all week long.
So before you throw out that soft banana or half-empty bag of frozen berries, give this recipe a try. Your wallet, your family, and the planet will thank you!
Got a favorite fruit leather combo? Share your creations with us in the comments or tag us on Instagram @SkyLineFarmsthegorge. on Facebook & Instagram. We’d love to see what you make! 🍓🌿